
TL;DR:
- Transferring your domain improves website reliability, consolidates management, and grants greater control over online assets. Proper preparation, including DNS backup, unlocking your domain, and verifying renewal costs, prevents costly downtime and unexpected expenses. Post-transfer, confirm DNS settings, test your website and email, and monitor performance to ensure a smooth transition.
Your business website keeps crashing, emails bounce unpredictably, and your current host's support team takes days to respond. Sound familiar? Thousands of small business owners hit this wall every year, and the fix often comes down to one critical move: transferring your domain to a better hosting provider. Done correctly, a domain transfer improves your site's reliability, centralizes your management, and puts you in control of your online presence. Done carelessly, it can knock your site offline for days. This guide walks you through every step so you get the benefits without the headaches.
Table of Contents
- Prepare for a smooth domain transfer
- Step-by-step domain transfer instructions
- Avoiding downtime and common mistakes
- Verifying your transfer and next steps
- Our experience: What most guides miss about domain transfers
- Take charge of your domain management with inSave Hosting
- Frequently asked questions
Key Takeaways
| Point | Details |
|---|---|
| Preparation is critical | Disable WHOIS privacy and backup your DNS records before any transfer. |
| Follow each step | Transfer your domain systematically to minimize downtime and errors. |
| Avoid common mistakes | Watch for renewal pricing traps and confirm transfer emails promptly. |
| Verify post-transfer | Test your website, email, and renewal settings after completing the transfer. |
| Centralized management matters | Consolidating hosting and domain services makes site control easier for SMBs. |
Prepare for a smooth domain transfer
Once you're clear on why transferring your domain matters, let's make sure you're properly prepared.
Before you touch a single setting, you need a solid checklist. Skipping the preparation phase is the number one reason domain transfers go sideways for small business owners. Think of it like moving office space: packing everything properly before the moving truck arrives saves you from searching for your lease documents in the middle of a busy workday.
Here are the critical things to check before starting your transfer:
- Disable WHOIS privacy protection. Your current registrar may have this enabled by default. WHOIS privacy masks your contact details, but it also blocks the authorization emails that are essential to completing the transfer. Turn it off before initiating anything.
- Export and save all DNS records. Your DNS records control where your website traffic goes, where your emails route, and how third-party services like payment processors and scheduling tools connect. Losing these records means your email stops working, and your site goes dark.
- Confirm your domain is not in "redemption" or "pending delete" status. A domain in redemption has already expired and is in a recovery phase. You cannot transfer it until it's fully restored. Use your registrar's control panel to check the current status clearly.
- Check your domain's age. ICANN (the Internet Corporation for Assigned Names and Numbers, the global body that governs domain names) prohibits transfers for domains registered within the last 60 days. The same 60-day lock applies if your domain was recently transferred.
- Verify your administrative email. The email address associated with your domain registration must be accessible. Authorization codes and confirmation requests go there, and a missed email can stall or cancel the transfer entirely.
One detail most guides gloss over is the renewal pricing situation. As noted in guidance on transfer extends expiration by 1 year, your domain registration gets extended by 12 months when a transfer completes. That sounds great until you notice the new registrar's renewal price the following year is significantly higher than you expected. Some registrars offer a low transfer price but charge a premium for renewals. Always check renewal pricing, not just the transfer fee.
"A domain transfer is not just a technical event. It's a business decision. Check where your renewal prices land after the transfer, not just the upfront cost."
Pro Tip: Before you start, create a simple text document with your current DNS records: A records, MX records, CNAME records, and TXT records. Your current registrar's DNS management panel will show all of these. Screenshot them too, just in case.
The table below gives you a quick overview of what to verify before transferring:
| Pre-transfer check | Why it matters | Action needed |
|---|---|---|
| WHOIS privacy status | Blocks authorization emails | Disable before transfer |
| DNS records backup | Prevents email and site loss | Export and save locally |
| Domain lock status | Prevents unauthorized moves | Unlock via registrar panel |
| Domain age (60+ days) | ICANN rule for eligibility | Check registration date |
| Admin email access | Required for confirmation codes | Update if outdated |
| Renewal pricing at new host | Avoid surprise cost increases | Compare before committing |
If you're still in the early stages and haven't finalized your domain name yet, our domain name selection guide can help you make a strong choice. And if you're starting fresh, learning how to register a domain the right way sets a solid foundation.
Step-by-step domain transfer instructions
With your preparations covered, now let's walk through the domain transfer process step-by-step.
This is where most tutorials get vague. They say "initiate the transfer" without explaining what to actually do in what order. Here's the precise sequence that protects your site from going offline.
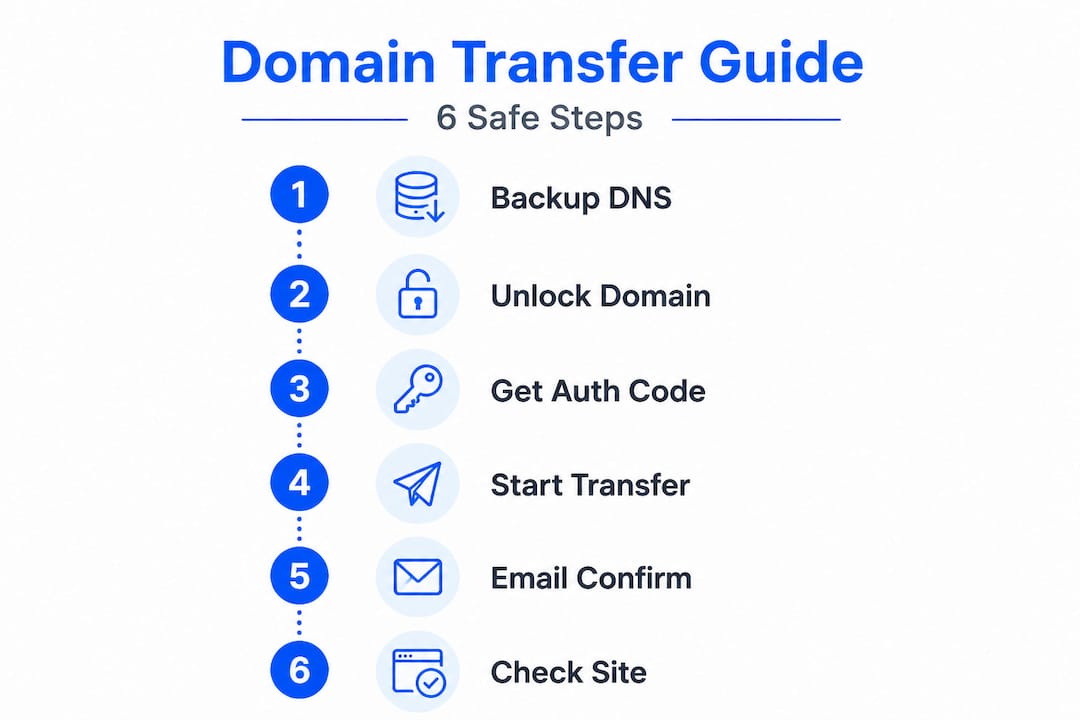
Step 1: Replicate your DNS records at the new hosting provider. Log in to your new host's control panel and manually recreate every DNS record you exported earlier. This includes your A record (which points your domain to your server's IP address), MX records (which route your email), and any CNAME or TXT records for tools like Google Search Console or third-party services. Completing this step before doing anything else means your site can serve traffic from the new server the moment the transfer finalizes.
Step 2: Change your nameservers first (if your new host allows it). Many business owners don't realize you can point your domain to a new hosting provider's servers without completing a full registrar transfer. Changing nameservers at your current registrar to point to your new host gets your site running on the new infrastructure faster. According to guidance on minimizing downtime during transfers, replicating DNS records at the new provider first and changing nameservers before the full transfer is the most reliable way to prevent service interruptions.
Step 3: Unlock your domain and request the authorization code. Go to your current registrar's control panel. Find the domain settings and look for a "Domain Lock" toggle. Disabling it allows the transfer to proceed. Once unlocked, request the EPP code (also called an authorization code or transfer secret). This is a string of characters your new registrar will need to verify the transfer request.
Step 4: Initiate the transfer at your new registrar. Log in to your new hosting provider's dashboard and start the transfer process. You'll enter your domain name and paste in the EPP code. The new registrar submits a transfer request to your current registrar.
Step 5: Confirm the transfer via email. Both your current registrar and your new one will send confirmation emails to your administrative contact address. Approve these promptly. Some registrars auto-approve after a waiting period, but acting quickly speeds up the process and prevents the transfer window from expiring.
Step 6: Test your site using a temporary URL. Most hosting providers give you a temporary staging URL so you can verify your website loads correctly on the new server before the domain transfer fully propagates. Use this to check that your pages load, forms submit, and checkout processes work.
| Transfer stage | Typical timeframe | Key action |
|---|---|---|
| DNS replication | Immediate | Manual entry at new host |
| Nameserver propagation | 24 to 48 hours | Monitor via DNS checker tool |
| EPP code request | Instant to 1 hour | Request from current registrar |
| Transfer initiation | Same day | Submit at new registrar |
| Email confirmation | Within hours | Approve both confirmation emails |
| Full transfer completion | 5 to 7 days | Verify domain shows new registrar |
Pro Tip: Use a free DNS propagation checker like whatsmydns.net to monitor when your nameserver changes take effect globally. Some regions propagate faster than others.
For a broader look at moving your entire website safely, our website migration checklist covers every element beyond just the domain. And if you want a deeper walkthrough of the hosting side of the move, the hosting migration guide is a great companion read.
Avoiding downtime and common mistakes
Having followed the transfer steps, it's just as important to protect against mistakes and ensure stable service.

Even careful business owners run into trouble during domain transfers. The most painful problems are avoidable with a bit of foresight.
Watch out for these common pitfalls:
- Transferring a domain in redemption or pending delete status. If your domain has expired and entered the redemption period, you must restore it first (often at a fee) before any transfer can happen. Attempting to transfer in this state will fail and waste your time.
- Missing confirmation emails. Transfer requests time out if you don't respond within the allowed window (usually 5 days). A missed email means starting over. As documented in a real-world case of rare but reported errors, unauthorized or mistaken transfers can and do happen when oversight is lacking. Always confirm from both sides.
- Falling into renewal price traps. Some registrars heavily discount the transfer fee but charge 40 to 60 percent more for year two renewals. Read the fine print on your new provider's renewal pricing before you commit.
- Skipping the backup step. Always back up your full website files and database before making any DNS or registrar changes. If something breaks during the transfer, you need a restore point. No exceptions.
- Not updating internal links or hardcoded URLs. If your site's code references specific server paths or IP addresses, those need updating after the move.
"Always treat a domain transfer like a site launch. Test everything, confirm all emails, and back up before you begin."
Pro Tip: Set a calendar reminder for 30 days before your domain's new renewal date (after the transfer adds a year). This gives you time to shop renewal rates or switch providers again if the pricing isn't competitive.
Understanding the broader landscape of domain types explained can also help you plan smarter, especially if you're managing multiple domains across different product lines or locations. For businesses managing several properties, our multi-domain hosting tips offer practical ways to cut complexity and cost.
Verifying your transfer and next steps
Once the transfer is confirmed, a few final checks will ensure your services run smoothly.
The transfer completing is not the finish line. Treat it as the starting gate for a verification sprint.
Here's what to confirm post-transfer:
- Check your domain's WHOIS record. Search your domain name on a WHOIS lookup tool and confirm the registrar name now shows your new provider. This is the clearest confirmation the transfer worked.
- Verify DNS settings are live. Compare your live DNS records against the backup you created before the transfer. Every record should match. If anything is missing, add it immediately.
- Test your website from multiple devices. Load your site on desktop and mobile, using different browsers. Confirm contact forms work, checkout flows complete, and media files load correctly.
- Test all email accounts. Send and receive emails from every address associated with your domain. Email is often the first casualty of a botched DNS setup.
- Re-enable WHOIS privacy protection. Now that the transfer is done, turn privacy protection back on at your new registrar to protect your personal contact details.
- Review your new renewal pricing and set a reminder. Know exactly what you'll pay for renewal and when. Budget it into your annual business costs.
As noted by Forbes Advisor's analysis, for small and medium-sized businesses, changing nameservers rather than doing a full registrar transfer is often the smarter quick-switch method. It avoids the 60-day post-transfer lock and moves your site to new hosting faster. This is especially worth considering if you just want better performance without the full administrative overhead of changing registrars.
Pro Tip: After your transfer is complete, consider using website monitoring tools to watch your site's uptime and performance around the clock. Catching issues within minutes beats finding out from a frustrated customer.
Our experience: What most guides miss about domain transfers
Most step-by-step guides treat domain transfers like a purely technical exercise. You unlock the domain, get a code, submit it somewhere, wait five days, done. But after working with hundreds of small business owners, we've learned that the real problems aren't technical. They're strategic.
The single most overlooked issue is the post-transfer renewal price trap. Businesses focus on the low transfer fee (sometimes as little as a dollar) and ignore what happens in year two. Suddenly they're paying twice what they budgeted for a domain that used to cost $12 a year. It's a frustrating situation that's entirely preventable.
The second blind spot is the assumption that a full registrar transfer is always necessary. For many SMBs, simply changing nameservers at their current registrar achieves the same practical outcome, faster, without the 60-day lock that comes after a completed transfer. This approach also means you're not locked out of making another hosting change if the new provider doesn't work out. We've seen business owners trapped for 60 days with a host they regret because they went straight to a full transfer when a nameserver switch would have done the job.
The third insight our web hosting migration advice consistently reinforces is this: centralized management matters more than most people realize. When your domain, hosting, SSL certificate, and email all live under one provider's dashboard, your administrative burden drops dramatically. Fewer logins. Fewer renewal dates to track. Fewer support queues to navigate when something breaks.
The transfer itself takes a week. The setup decisions you make before and after it determine whether you're still troubleshooting three months from now or running a tight, well-managed online presence.
Take charge of your domain management with inSave Hosting
Ready to streamline your domain and hosting? Here's how inSave Hosting can help.
Moving your domain to a host that handles everything in one place doesn't have to be complicated. inSave Hosting makes the process straightforward with free migration support, intuitive DNS management, and a control panel built for business owners, not developers.
Whether you're switching from an underperforming registrar or centralizing your domain with your hosting for the first time, inSave Hosting has plans designed for your scale. Explore shared hosting plans for lean operations, or check out WordPress hosting options if your site runs on WordPress. You can also search and domain purchase directly through inSave for a truly unified setup. With 99.9% uptime, free SSL, and LiteSpeed-powered performance, your next transfer can be your last.
Frequently asked questions
How long does a domain transfer take?
Most domain transfers take 5 to 7 days, depending on how quickly your current registrar processes the request and how promptly you confirm the authorization emails required.
Will my website or email go offline during the transfer?
Not if you replicate your DNS records at the new provider before the transfer starts and confirm all nameserver settings are live. Replicating DNS first is the key step that prevents service interruptions.
Does transferring a domain change its expiration date?
Yes. A completed transfer extends registration by one year beyond your current expiration date, which is generally a benefit, but always verify the new registrar's renewal price before you transfer.
What risks should I be aware of before transferring?
The main risks include renewal pricing surprises, unauthorized transfers from missed confirmation emails, and service disruptions if you skip the DNS backup step. Rare but real errors from registrar mistakes also highlight why backing up your full site and database before any transfer is non-negotiable.