
TL;DR:
- Proper caching enhances website speed and security when configured correctly across layers.
- Excluding sensitive or personalized pages from cache prevents data leaks and privacy breaches.
- Use a single, well-optimized caching plugin aligned with host-level cache for best results.
Caching in hosting: faster, safer sites in 2026
Most website owners assume that turning on caching is like flipping a switch that makes everything faster. In reality, caching is one of the most misunderstood tools in web hosting. Set it up correctly and your site feels lightning-fast, even under heavy traffic. Set it up wrong and you risk serving stale content, broken pages, or worse, exposing a user's private data to someone else. This guide cuts through the confusion and gives you a clear, practical understanding of how caching works across different hosting layers, what can go wrong, and how to configure it safely and strategically for your WordPress or business site.
Table of Contents
- What is caching and why does it matter in hosting?
- Understanding caching layers: Browser, host, plugin, and CDN
- Caching and website security: Avoiding data leaks and errors
- Best practices for SMBs and WordPress: Strategic cache management
- Why smart caching is more than speed: The overlooked essentials
- Take your site further: Hosting solutions tailored for performance
- Frequently asked questions
Key Takeaways
| Point | Details |
|---|---|
| Caching boosts speed | Storing website content in cache layers reduces load times and server strain for visitors. |
| Layer conflicts can hurt | Improperly stacked caching systems often slow sites or cause technical issues. |
| Protect user data | Safe caching rules are crucial to prevent exposing personalized information to others. |
| Choose smart strategies | Strategic cache management means faster, safer, and more reliable business websites. |
What is caching and why does it matter in hosting?
At its core, caching is the process of temporarily storing a copy of a file or web page so that future requests for that same content can be served faster, without the server having to regenerate it from scratch every single time. Think of it like a restaurant that preps popular dishes in advance instead of cooking each meal to order during peak hours. The meal arrives faster, and the kitchen stays calmer.
For small and medium-sized businesses, the stakes around site speed are very real. A site that loads in under two seconds can convert visitors at a dramatically higher rate than one that takes four or five seconds. Slow sites also rank lower in Google search results, which means fewer potential customers ever find you in the first place. This is why hosting impacts on speed matter so much and why caching is central to any solid hosting strategy.
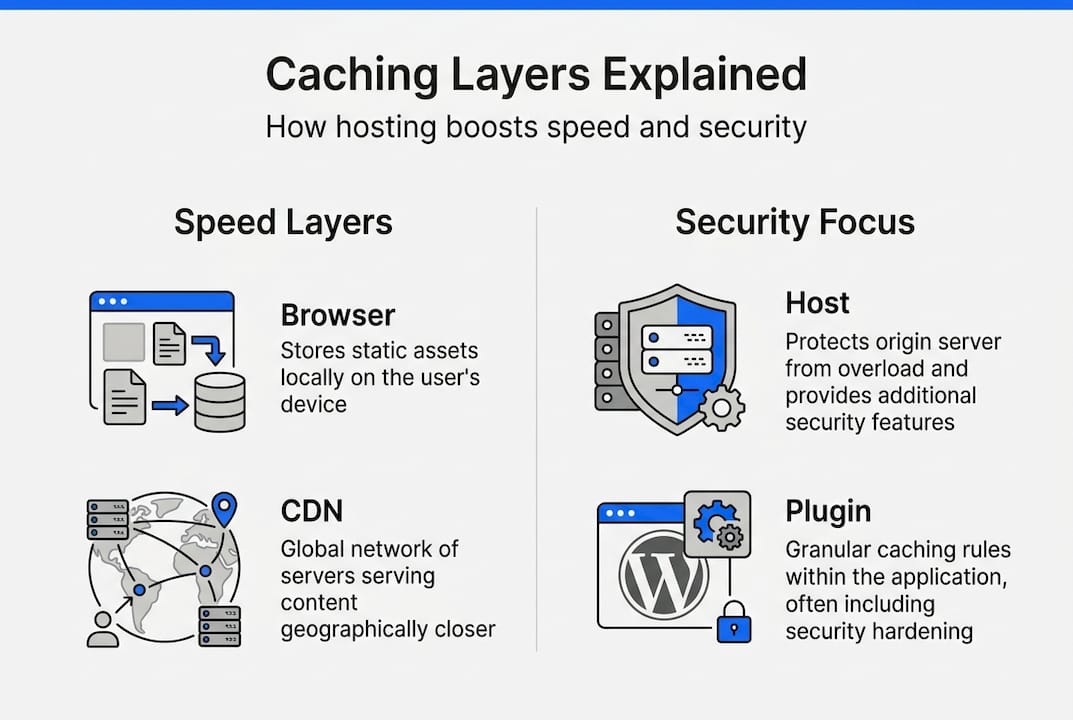
There are four main types of caching you will encounter:
- Browser cache: The user's web browser saves copies of images, CSS files, and scripts locally. On a return visit, it loads those files from the device instead of downloading them again.
- Server or host cache: Your hosting provider stores rendered versions of pages at the server level, reducing how often WordPress has to query the database.
- Plugin cache: A caching plugin like WP Rocket or W3 Total Cache generates static HTML files from your dynamic WordPress pages.
- CDN or edge cache: A content delivery network stores copies of your assets on servers around the world, serving them from the location closest to each visitor.
HTTP caching works at different network layers, including the browser, CDN edge, and corporate proxies, each governed by caching headers and variations like cookies and personalization. This means cache correctness depends entirely on how each layer decides to cache versus bypass a request.
Here is a quick look at how each caching type compares across key performance factors:
| Cache type | Location | Speed gain | Complexity | Best for |
|---|---|---|---|---|
| Browser cache | User's device | High for repeat visits | Low | Static assets |
| Server/host cache | Hosting server | Very high | Medium | Full page output |
| Plugin cache | WordPress layer | High | Medium | CMS-driven sites |
| CDN/edge cache | Global network nodes | High for all visitors | Medium-High | Media-heavy sites |
For hosting optimization basics, understanding which cache layer does what job allows you to build a smart, layered strategy instead of doubling up on the same function. Stacking without a plan creates redundancy and conflicts rather than speed.
Understanding caching layers: Browser, host, plugin, and CDN
Now that you understand what each caching layer does individually, the next question is: what happens when they all run at the same time? For most WordPress sites, the answer is a mix of performance gains and potential headaches.
Browser caching is the simplest to manage. You set HTTP cache headers like "Cache-ControlorExpires` that tell browsers how long to store specific files. Images and fonts rarely change, so you can safely cache them for 30 days or more. CSS and JavaScript files change more often, so shorter expiry times or cache-busting filename hashes are common approaches.
Host-level caching, offered by providers using technologies like LiteSpeed and LSCache, works at the server layer before WordPress even loads. This is powerful because the server can return a cached HTML page without booting PHP, running database queries, or processing plugins. The result is response times that can be 5 to 10 times faster compared to an uncached dynamic WordPress page.
Plugin-level caching tools like WP Rocket, W3 Total Cache, or LiteSpeed Cache for WordPress add their own caching rules on top of that. They give you granular control over what gets cached, how long it stays cached, and which pages are excluded. The challenge comes when plugin caching overlaps with host caching. You can end up with two cached versions of the same page that were created at different times, causing one to override the other unpredictably.
A major edge case in WordPress hosting is cache fragmentation and conflicts between layers, such as the host cache, plugin cache, and CDN or edge cache, which can cause stale content or break functionality. This is not theoretical. It happens to real sites every day.
Here is how the four layers compare on the factors that matter most to WordPress site owners:
| Feature | Browser | Host/Server | Plugin | CDN/Edge |
|---|---|---|---|---|
| Setup difficulty | Easy | Depends on host | Moderate | Moderate |
| Global reach | No | No | No | Yes |
| WordPress-aware | No | Sometimes | Yes | Rarely |
| Cache purge control | Limited | Via host panel | Full | Varies |
For more on choosing the right WordPress caching tips, look for a host that builds caching at the server level and integrates cleanly with your caching plugin, rather than fighting against it. Reviewing key WordPress hosting features before committing to a plan can save you significant troubleshooting time later.
Pro Tip: Use only one caching plugin at a time on your WordPress site. If your host already provides server-level caching, disable full-page caching in your plugin and use the plugin only for additional optimization tasks like file minification or lazy loading.
Caching and website security: Avoiding data leaks and errors
Speed is important, but caching done wrong can turn into a security liability. This is one of the least-discussed risks of misconfigured caching, and it can have serious consequences for businesses that handle user accounts, orders, or any kind of personalized content.

Here is the core problem: caching works by storing a page and serving that same stored version to future visitors. If a logged-in customer views their order history and that page gets cached, another visitor could potentially see that same cached page, including personal data, order details, or even payment information. This is not a rare edge case. It is a well-documented failure mode that occurs when cache bypass rules are missing or misconfigured.
Caching must avoid serving personalized or private content to the wrong users. For WooCommerce and membership sites, cache bypass rules and correct cache keying and exclusions are absolutely essential to prevent data leakage.
The pages that must never be cached include:
- Cart and checkout pages: These contain real-time product, pricing, and user-specific data.
- Account and profile pages: Order history, saved addresses, and personal details must stay private.
- Login and registration pages: Caching these can interfere with nonce tokens, which are security keys WordPress uses to verify form submissions.
- Search results pages: These are often dynamic and may return different results based on user context or session data.
- Any page with personalized greetings or content: If a page says "Welcome back, Sarah," it must never be served from a static cache.
Setting up safe caching starts with understanding your site's architecture. Walk through your site as a logged-in user and note every page that shows user-specific content. Then make sure each of those URLs is included in your cache exclusion list.
"Cache bypass rules and correct cache keying are not optional for sites with user accounts, e-commerce carts, or dynamic content. They are the difference between fast and dangerous." — WP Rocket Optimization Guide
Pro Tip: Most caching plugins and host-level cache systems include a field where you can list URLs to exclude. Paste in /cart/, /checkout/, /my-account/, and any other sensitive paths. Test by logging in as a real user and verifying that private content is never cached or served to a logged-out session.
For more on protecting your site, the hosting security essentials guide covers the full picture of why secure hosting is non-negotiable for any business handling customer data.
Best practices for SMBs and WordPress: Strategic cache management
Now that you understand the risks and the layers involved, it is time to build a caching strategy that actually works for your site without creating new problems in the process.
The goal is not to enable every caching feature available. The goal is to apply the right caching in the right places with a clear plan for maintaining it over time. Here are the steps that make the biggest difference:
-
Audit your current setup. Before adding any new caching tools, find out what caching your hosting provider already delivers. Many hosts using LiteSpeed with LSCache already handle full-page caching at the server level. Enabling a separate caching plugin on top of that without disabling its page caching feature doubles your complexity for no extra benefit. Check your hosting dashboard or contact your host directly.
-
Choose one caching plugin and configure it carefully. Stacking multiple caching plugins causes conflicts and slowdowns. Pick one, configure it with proper exclusions for dynamic pages, and stick with it. WP Rocket, LiteSpeed Cache, and W3 Total Cache are all solid options when configured correctly.
-
Set cache expiry times based on content type. Static assets like images, fonts, and CSS can be cached for long periods, from one week to one month. Blog posts and product pages benefit from shorter cache lifetimes, perhaps a few hours to a day, so updates appear quickly without manual intervention every time.
-
Clear your cache deliberately after every update. When you update a plugin, theme, or post content, always purge the cache immediately. Visitors may otherwise see an old version of your site for hours or days. Most caching tools offer a one-click purge button in the WordPress admin bar.
-
Test after every cache configuration change. Use a browser in incognito mode, or a tool like GTmetrix or Google PageSpeed Insights, to check that your changes are working and that no errors have been introduced. Look for visual glitches, missing elements, or incorrect content as signs of cache issues.
-
Work with your host to align caching rules. Hosting providers experienced with WordPress can help you configure server-level cache rules that complement your plugin setup rather than conflict with it. This is especially important for WooCommerce stores or sites with membership areas.
For advanced optimization steps and advanced hosting technologies like HTTP/2 and PHP 8, combining these with smart caching can produce measurable gains in load time and server efficiency. You can also read real hosting success stories to see how other small businesses have tackled the same challenges.
Pro Tip: Create a simple checklist for your team or yourself: after every site update, run through cache purge, visual check in incognito, and a speed test. This three-step routine takes less than five minutes and prevents most cache-related problems before they ever reach a customer.
Why smart caching is more than speed: The overlooked essentials
Most articles on caching focus almost entirely on milliseconds and performance scores. That matters, but it is only part of the story. We have seen businesses get so focused on squeezing out load-time gains that they overlook what a caching mistake actually costs them in trust and reputation.
Imagine a WooCommerce store where a misconfigured cache briefly serves one customer's cart contents to another. That is not just a technical bug. That is a potential GDPR incident, a damaged customer relationship, and a support nightmare rolled into one. For a small business, one incident like that can do more harm than a slow site ever would.
The businesses that handle caching best in 2026 are the ones treating it as part of their broader strategy around reliability and secure hosting, not just a performance optimization checkbox. Caching decisions directly affect how users experience your brand, whether they trust your checkout, and whether your content stays consistent and accurate. Getting it right protects your customers and your business simultaneously. A proactive approach to caching is an investment in reputation, not just speed.
Take your site further: Hosting solutions tailored for performance
Understanding caching strategy is the first step. The second step is making sure your hosting infrastructure supports that strategy without extra effort on your part.
At InSave Hosting, our WordPress hosting plans come with built-in LiteSpeed and LSCache technology, which means smart caching is handled at the server level right out of the box. For WooCommerce stores, member sites, or any dynamic WordPress setup, our team helps configure the cache bypass rules that protect your customers and keep your site running correctly. Explore our shared hosting options or browse all hosting services to find the plan that fits your site's needs and takes caching complexity off your plate entirely.
Frequently asked questions
What happens if I use multiple caching plugins?
Using more than one caching plugin can cause cache conflicts and slowdowns, leading to broken layouts, stale content, and unpredictable behavior. Stick with a single, well-configured plugin.
How does caching impact security on my website?
Improper caching can expose personal information to the wrong users if you skip bypass rules for private or dynamic pages. Cache bypass rules and exclusions are essential for any site handling user accounts or purchases.
Do I need to clear my cache after site updates?
Yes, always clear your cache after updating plugins, themes, or content. Failing to do so means visitors may continue seeing outdated versions of your pages instead of the latest changes.
Which web pages should never be cached?
Never cache cart, checkout, or account pages because they contain personalized and sensitive data. Caching these URLs can result in one user seeing another's private information, which is both a security risk and a compliance concern.