
TL;DR:
- Setting up a content delivery network can reduce website load times by 40 to 60 percent for international visitors. Proper configuration requires verifying DNS access, origin server details, SSL certificates, and cache headers before setting up the CDN. Using a dedicated origin hostname and fingerprinted static assets helps ensure effective caching and easy troubleshooting.
A content delivery network, or CDN, is a system of geographically distributed servers that caches and delivers your website's files from the location closest to each visitor. Knowing how to set up a CDN is one of the highest-impact changes you can make for site performance. A properly configured CDN reduces page load times for international visitors by 40–60%. Top-tier networks span over 335 cities worldwide, meaning your content reaches users from an edge server nearby rather than traveling across continents. This guide walks you through every step, from prerequisites to verification, so you can configure CDN for your website with confidence.
How to set up a CDN: what you need before you start
Getting your CDN installation right starts with having the correct assets in place. Skipping this checklist is the single most common reason a CDN setup fails on the first attempt.
What you need:
- Domain registrar access. You must be able to edit DNS records for your domain. Log into your registrar or DNS provider and confirm you can add or modify CNAME, A, and TXT records.
- Origin server details. Know your server's IP address or dedicated hostname. Many developers create a subdomain like
origin.yourdomain.comthat points directly to the server. This keeps the CDN layer separate from the origin. - A valid SSL certificate on the origin. CDNs connect to your origin over HTTPS. If your origin does not have a valid certificate, the CDN will throw connection errors. inSave Hosting includes free SSL certificates with its hosting plans, which satisfies this requirement immediately.
- Cache-Control header knowledge. Your server must send correct
Cache-Controlheaders. Without them, the CDN cannot intelligently decide what to cache, and your performance gains disappear. Learn the difference betweenmax-age(browser cache) ands-maxage(CDN cache). - Fingerprinted static assets. Rename files like
style.csstostyle.v2.cssbefore you go live. This practice, called file fingerprinting, prevents stale cached versions from reaching visitors after a deployment. - DNS record type awareness. Standard DNS specs block CNAME records at the root domain (apex). You will need to use a
wwwsubdomain or a DNS provider that supports ALIAS or ANAME flattening for root domains.
Pro Tip: Create a staging checklist that mirrors your production DNS and origin settings. Testing your CDN configuration on a staging subdomain before switching production traffic saves hours of troubleshooting.
What are the step-by-step instructions to configure your CDN?
Setting up a CDN follows a consistent sequence regardless of which provider you choose. Each step builds on the last, so work through them in order.
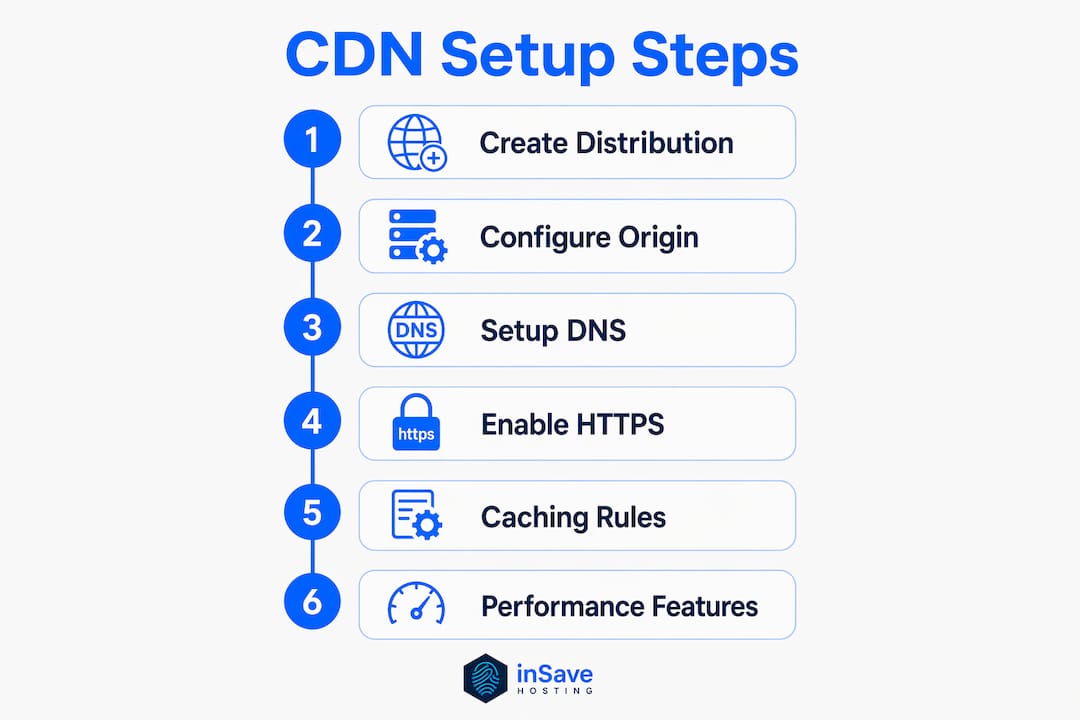
Step 1: Create a CDN distribution or pull zone
Log into your CDN provider's dashboard and create a new distribution. Most providers call this a "pull zone" or "CDN distribution." Enter your origin URL, which should be your dedicated origin hostname (for example, origin.yourdomain.com) rather than your public domain. This separation prevents redirect loops later.

Step 2: Configure origin settings and headers
Point the pull zone at your origin server's IP or hostname. Set the origin protocol to HTTPS. Then verify that your origin server responds with proper Cache-Control headers. A header like Cache-Control: public, max-age=86400, s-maxage=604800 tells the CDN to cache the file for seven days while browsers cache it for one day. Experienced developers treat origin headers as the foundation of successful CDN caching.
Step 3: Configure DNS records
Point your website's hostname to the CDN. For a www subdomain, add a CNAME record pointing to the CDN's provided hostname (for example, yoursite.cdn-provider.net). For the root domain, use your DNS provider's ALIAS or ANAME record, or enable DNS flattening if your provider supports it. This avoids the CNAME restriction at the apex while keeping email and other DNS records intact.
Step 4: Enable HTTPS at the edge
CDN providers typically automate TLS certificate issuance via Let's Encrypt, so HTTPS at the edge requires only a toggle in the dashboard. Enable it. Set your CDN to redirect all HTTP requests to HTTPS. Confirm that both the CDN edge and your origin use valid certificates to avoid mixed-content warnings.
Step 5: Set caching rules and TTL values
Define which file types the CDN should cache and for how long. The table below shows recommended cache TTL values by asset type.
| Asset type | Recommended TTL | Notes |
|---|---|---|
| Images (JPG, PNG, WebP) | 30 days | Use fingerprinted filenames for safe long TTLs |
| CSS and JavaScript | 7–30 days | Fingerprint filenames on every deploy |
| HTML pages | 0–5 minutes | Avoid caching dynamic or personalized pages |
| Fonts | 365 days | Fonts rarely change; long TTL is safe |
| API responses | 0 seconds | Never cache authenticated or dynamic API calls |
Step 6: Enable performance features
Turn on minification for HTML, CSS, and JavaScript inside your CDN dashboard. Enable Brotli or Gzip compression if your CDN supports it. Activate HTTP/2 or HTTP/3 delivery, as both protocols reduce latency through multiplexing. These features require no code changes on your origin server.
Pro Tip: Enable "Always Online" or "Stale-While-Revalidate" in your CDN settings. This serves a cached version of your page to visitors even when your origin server is temporarily unavailable, protecting uptime during maintenance windows.
How can you verify your CDN setup is effective and troubleshoot common issues?
Verification is not optional. A CDN that appears to work but serves content from the origin defeats the entire purpose of setting one up.
Verification checklist:
- Check HTTP response headers. Use your browser's developer tools or a tool like
curl -I https://yourdomain.comto inspect response headers. Look for aCF-Cache-Status: HITheader or equivalent from your CDN. A "MISS" on the first request is normal; a "HIT" on the second confirms caching is active. - Test from multiple global locations. Use a web performance testing service to run load time tests from cities in Asia, Europe, and North America. A working CDN produces similar load times across all regions. Significant variation points to a misconfiguration.
- Inspect for cache misses on static assets. If images and CSS files consistently return "MISS," your
Cache-Controlheaders are likely missing or set tono-store. Fix the origin headers first, then purge the CDN cache. - Check for redirect loops. A redirect loop usually means your CDN is set to HTTP while your origin forces HTTPS back to the CDN. Set both the CDN and origin to HTTPS and disable any HTTP-to-HTTPS redirect on the origin that conflicts with the CDN's own redirect rule.
- Verify root domain behavior. If your root domain does not resolve through the CDN, your DNS flattening or ALIAS record is missing. Contact your DNS provider to confirm ALIAS support.
"The most overlooked step in any CDN installation guide is checking the origin's response headers before the CDN is even configured. If the origin sends
Cache-Control: no-storeor no cache header at all, the CDN will pass every request straight through to the server. The CDN becomes an expensive proxy rather than a cache. Fix the headers at the origin first, then configure the CDN around them."
Cache invalidation is the other common failure point. File fingerprinting solves most cache-busting problems automatically by changing the filename on each deploy. For cases where you need to clear cached content immediately, use your CDN provider's purge API or dashboard purge tool. Never cache HTML pages that contain user-specific data, session tokens, or shopping cart content. Dynamic content served through a CDN without proper exclusion rules causes data leaks between users.
What are the best CDN setup practices to maximize website performance in 2026?
Following the steps above gets your CDN running. These practices keep it running well over time.
- Use a dedicated origin hostname. Keep a separate origin hostname like
origin.yourdomain.comthat bypasses the CDN entirely. This gives you direct server access for debugging without disrupting live traffic. - Set both
max-ageands-maxagein Cache-Control headers. Themax-agedirective controls the browser cache. Thes-maxagedirective controls the CDN cache independently. Using both gives you precise control over each caching layer. - Fingerprint every static asset in your build process. Implement fingerprinting in your build tool so every deploy automatically generates new filenames for changed files. This eliminates stale content without requiring manual cache purges.
- Activate HTTP/2 or HTTP/3 at the CDN edge. Both protocols deliver multiple files over a single connection, cutting the overhead that slows older HTTP/1.1 connections. Most modern CDN providers enable HTTP/2 by default; HTTP/3 often requires a manual toggle.
- Keep your origin server fast. A CDN cannot compensate for a slow origin on cache misses. Use LiteSpeed, LSCache, and PHP8 at the origin level. inSave Hosting's plans include LiteSpeed and LSCache by default, which means your origin responds quickly even when the CDN needs to fetch a fresh copy.
- Start with a free CDN tier. Free plans from modern CDN providers cover full CDN delivery and basic security for most small and medium business sites. Upgrade only when you need advanced features like custom firewall rules or dedicated IP addresses. For a deeper look at cost-effective options, the guide on free CDN offerings covers what free tiers actually include in 2026.
Pro Tip: Review your CDN analytics monthly. A sudden spike in cache miss rates usually signals a code deploy that changed file paths without updating fingerprinting, or a new page type that lacks proper Cache-Control headers.
Key takeaways
A CDN reduces load times for global visitors by 40–60% only when the origin server sends correct Cache-Control headers and DNS records point accurately to the CDN edge.
| Point | Details |
|---|---|
| Prepare before configuring | Confirm DNS access, origin SSL, and Cache-Control headers before touching CDN settings. |
| Fingerprint static assets | Rename files on every deploy to prevent stale content without manual cache purges. |
| Use a dedicated origin hostname | Keep origin.yourdomain.com separate from your public domain to avoid redirect loops. |
| Verify with response headers | Check for CDN cache HIT status in HTTP headers after setup to confirm caching is active. |
| Start on a free CDN tier | Free plans cover full CDN delivery and baseline security for most small business sites. |
What I've learned from real CDN setups that most guides skip
After working through CDN configurations on dozens of sites, the pattern is clear: most problems trace back to the origin, not the CDN itself. Developers spend hours adjusting CDN settings when the real issue is a server sending Cache-Control: no-store on every response. The CDN is doing exactly what it is told. The origin is telling it to do nothing useful.
The second most common mistake is skipping the dedicated origin hostname. Without it, you have no clean way to test whether a problem lives at the CDN edge or on the server. When production traffic runs through the CDN and your only access point is the public domain, debugging becomes guesswork.
For small and medium business owners, the free CDN tier argument is real. Free plans fit most SMB needs and provide a solid baseline for security and delivery. You do not need an enterprise contract to see meaningful speed improvements. Pair a free CDN with a hosting plan that already includes LiteSpeed and LSCache, and you get two caching layers working together without extra cost.
The final thing most CDN guides miss: keep your CDN and origin configurations synchronized. When you update a server-side redirect or change a URL structure, update your CDN caching rules at the same time. Mismatched configurations between the two layers cause the kind of intermittent bugs that are nearly impossible to reproduce. For a broader look at how CDN fits into your overall hosting stack, the article on CDN's role in hosting is worth reading alongside this one.
— Ihor
inSave Hosting makes CDN setup straightforward
Setting up a CDN works best when your hosting foundation is already built for speed. inSave Hosting's shared hosting plans include LiteSpeed, LSCache, HTTP/2, PHP8, and free CDN integration out of the box. That means your origin server is already configured to send fast, cache-friendly responses before you add a CDN layer on top.
inSave Hosting also includes free SSL certificates with every plan, which satisfies the HTTPS origin requirement that CDN providers demand. If you run WordPress, the WordPress hosting plans add staging tools and one-click installs that make testing your CDN configuration before going live much simpler. For developers and site owners who want performance without a complex setup, inSave Hosting removes the friction at the hosting layer so the CDN layer can do its job.
FAQ
What does a CDN actually do for my website?
A CDN caches your website's static files on servers distributed across hundreds of locations worldwide. Visitors receive files from the nearest server, which reduces load times by 40–60% for international traffic.
Can I use a CDN on a root domain like example.com?
Standard DNS rules block CNAME records at the root domain. Use a www subdomain or a DNS provider that supports ALIAS or ANAME flattening to route your root domain through a CDN without breaking other DNS records.
How do I know if my CDN is actually caching content?
Check the HTTP response headers using your browser's developer tools or curl. A CF-Cache-Status: HIT header or its equivalent from your CDN provider confirms that the edge server served the file from cache rather than fetching it from your origin.
Do I need to pay for a CDN to see real performance gains?
Free CDN tiers from modern providers cover full content delivery and basic security for most small and medium business sites. Paid plans add features like advanced firewall rules and dedicated IPs, but free plans deliver meaningful speed improvements for the majority of websites.
What is the most common CDN setup mistake?
The most common mistake is failing to configure correct Cache-Control headers on the origin server. Without them, the CDN passes every request through to the origin and provides no caching benefit, regardless of how the CDN itself is configured.