
TL;DR:
- A staging site is a private clone of your live website used for testing changes before deployment.
- Setting up one requires proper access, domain management, backups, and security measures like SSL and access controls.
- Effective deployment relies on verified workflows, such as using hosting tools, plugins, or manual methods with strict security protocols.
A staging site is a private, fully functional replica of your live website where you test changes before they reach real users. Every serious deployment workflow depends on one. Without a staging environment, a single plugin update or theme edit can break checkout flows, corrupt database records, or take your site offline during peak traffic. Tools like WP Staging, WP-CLI, and managed hosting panels from providers including inSave Hosting make the process accessible regardless of your technical depth. This guide covers every method, from one-click hosting tools to manual server setup, along with the security and deployment practices that separate professional workflows from risky guesswork.
How to create a staging site: prerequisites and tools
Before you build a staging site, confirm you have the right access and credentials in place. Missing one item at this stage causes delays mid-setup, which is the worst time to discover you lack SSH access or database credentials.
Here is what you need before starting:
- Hosting control panel access (cPanel, Plesk, or a custom managed panel) or direct server access via FTP and SSH
- WordPress admin credentials for the live site you are cloning
- Database credentials including the database name, username, and password from your "wp-config.php` file
- A backup tool such as UpdraftPlus or Duplicator to snapshot the live site before cloning
- A staging plugin like WP Staging if you prefer a plugin-based approach
- Domain management access to create a subdomain (for example,
staging.yourdomain.com) or a subdirectory path - An SSL certificate for the staging subdomain. A wildcard SSL certificate covers all subdomains under a single domain, which is the most efficient option for developers managing multiple environments
Pro Tip: Before cloning, disable any caching plugins on the live site. Cached files can interfere with the clone process and cause the staging copy to serve stale content from the start.
A staging subdomain is the standard industry choice over a subdirectory because it isolates cookies, sessions, and server configurations cleanly. Subdirectories can bleed session data between environments if your server configuration is not precise.

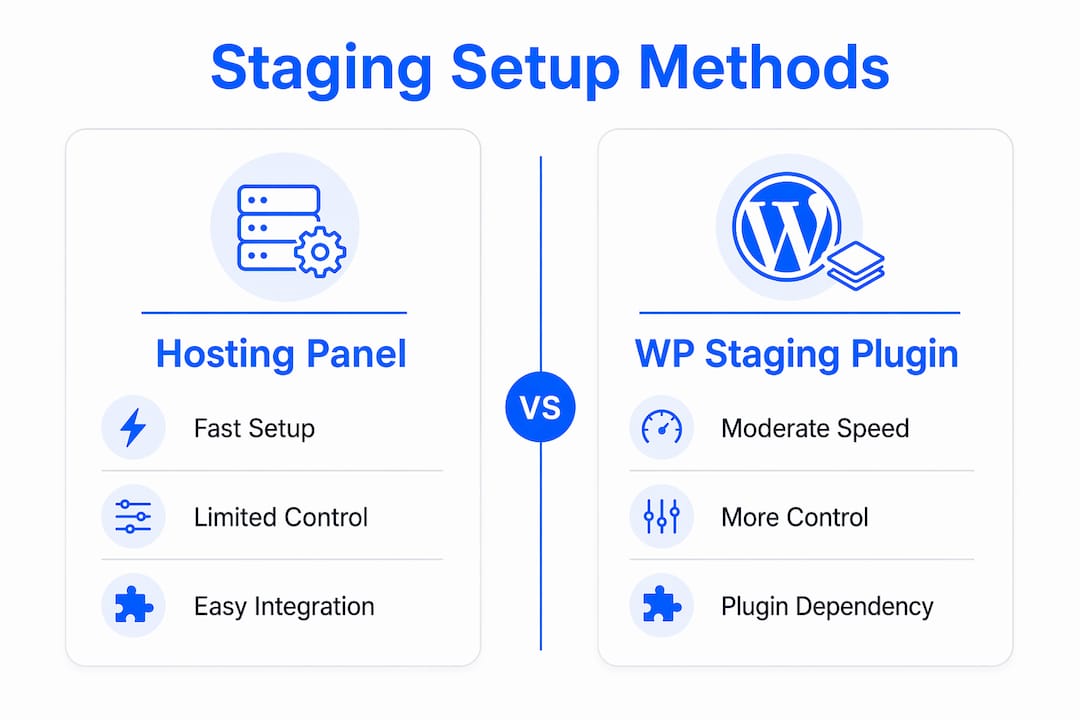
What method should you use to set up staging?
Hosting providers often offer one-click staging tools that clone files and databases while handling URL replacement automatically. This is the fastest path. The WP Staging plugin is the best alternative when your host does not offer native staging, or when you need more granular control over what gets cloned.
Using your hosting panel (one-click method)
- Log into your hosting control panel and locate the staging or WordPress management section.
- Select your live site and choose "Create Staging Site" or an equivalent option.
- The panel clones your files and database to a new subdomain (typically
staging.yourdomain.com). - Confirm that URL replacement has run correctly by visiting the staging URL and checking that internal links resolve to the staging domain, not the live one.
- Restrict access immediately using HTTP Basic Auth through your panel's security settings.
Using the WP Staging plugin
- Install and activate WP Staging from the WordPress plugin repository on your live site.
- Navigate to WP Staging > Start and click "Create new staging site."
- Choose which tables and directories to include. Exclude the
uploadsfolder if your media library is large to speed up cloning significantly. - Set the staging subdirectory path or connect it to a subdomain.
- Click "Start Cloning" and wait for the process to complete. WP Staging handles URL replacement automatically.
- Log into the staging admin using the credentials WP Staging provides and verify the site loads correctly.
The table below compares both approaches across the factors that matter most to developers:
| Factor | Hosting panel method | WP Staging plugin method |
|---|---|---|
| Setup speed | Very fast (minutes) | Moderate (10 to 20 minutes) |
| Technical control | Limited to panel options | High (table and file selection) |
| URL replacement | Automatic | Automatic |
| Cost | Included with hosting plan | Free tier available; Pro adds push-to-live |
| Best for | Quick clones on managed hosts | Custom environments, selective cloning |
Pro Tip: When using WP Staging, exclude the wp-content/uploads directory during initial cloning and symlink it to the live uploads folder instead. This cuts clone time dramatically on media-heavy sites without losing image references.
How do you set up staging manually with full control?
Manual setup gives you complete authority over every configuration file, database table, and server directive. It is the right choice for developers working on VPS or dedicated servers, or anyone who needs staging behavior that no plugin can replicate.
Step-by-step manual staging setup
- Create the staging subdomain in your DNS and server configuration. Point
staging.yourdomain.comto a new document root directory on the same server. - Copy site files from the live document root to the staging document root using SCP or rsync via SSH.
- Export the live database using phpMyAdmin or WP-CLI:
wp db export live-backup.sql --allow-root - Create a new staging database in cPanel or via MySQL, then import the exported file:
mysql -u staginguser -p staging_db < live-backup.sql - Copy
wp-config.phpto the staging root and update the database name, username, and password to match the staging database credentials. - Run URL search-replace using WP-CLI to update all references from the live domain to the staging domain. WP-CLI search-replace commands prevent breaking serialized WordPress data, which is a common failure point when doing this manually in phpMyAdmin.
wp search-replace 'https://yourdomain.com' 'https://staging.yourdomain.com' --all-tables --allow-root
Security checklist for your staging environment
Once the files and database are in place, lock down the environment before you share it with anyone.
- Add HTTP Basic Auth via
.htaccessor your server's Nginx configuration. HTTP Basic Auth is essential because noindex alone does not block unauthorized human access or crawling. - Add
X-Robots-Tag: noindex, nofollowheaders in your server config to prevent search engines from indexing staging content. - Set
MAIL_MAILERtologmode in your environment configuration. Setting MAIL_MAILER to log prevents transactional emails from reaching real users during testing. - Avoid overwriting the staging
.envfile during any sync operations. Overwriting the staging.envfile risks activating production database credentials or live mail delivery on your test environment. - Install a wildcard SSL certificate on the staging subdomain to encrypt traffic between testers and the server.
Treat your staging environment as a gatekeeper, not a sandbox. It holds a copy of real customer data, real database structures, and real credentials. A poorly secured staging site is a direct attack surface against your production system.
How do you test and deploy from staging to production safely?
Testing on staging is only valuable if you cover the right flows. Critical staging tests include homepage loads, navigation, login and logout, contact forms, and WooCommerce checkout with test payments. Skipping any of these is how broken checkout pages reach live customers.
Run through this verification checklist before every deployment:
- Homepage renders correctly with no broken images or layout shifts
- Primary navigation links resolve to the correct staging URLs
- Login and logout work for both admin and subscriber roles
- All contact forms submit successfully and log entries (not send real emails)
- WooCommerce product pages, cart, and checkout complete a full test transaction
- Custom post types, taxonomies, and archive pages load without errors
- Mobile responsiveness across at least two viewport sizes
Deploying from staging to production
Keeping staging and production environments entirely separate reduces deployment risks by enabling verification before any live changes occur. The cleanest deployment workflow uses Git branches. Using Git branches for staging and production lets you control exactly which code gets promoted and when, with a full audit trail.
For WooCommerce sites, use selective push strategies that push files only or specific database tables. Selective push strategies prevent overwriting live order data when pushing staging database changes to production. This is one of the most common and costly mistakes in WooCommerce deployments.
After deployment, clear all caches including LiteSpeed Cache, WP Super Cache, or any CDN layer. Monitor your live site's error logs for the first 30 minutes post-deployment. Keep a database backup from just before the push so you can roll back in under five minutes if something breaks.
Pro Tip: Always take a fresh production backup immediately before pushing staging changes live. Even if you tested thoroughly, production data changes between when you cloned and when you deploy. That backup is your rollback plan.
Key takeaways
A secure, functional staging site requires isolated resources, layered access controls, and a disciplined deployment workflow before any change reaches production.
| Point | Details |
|---|---|
| Choose the right method | Use hosting panel tools for speed; use WP Staging or manual setup for control. |
| Secure before sharing | Apply HTTP Basic Auth, noindex headers, and SSL to every staging environment. |
| Test critical user flows | Cover homepage, navigation, login, forms, and checkout before every deployment. |
| Use Git for deployments | Separate staging and main branches give you controlled, auditable code promotion. |
| Protect live data | Use selective pushes to avoid overwriting production orders or customer records. |
Why most staging failures come down to security, not setup
Ihor here. After years of working with WordPress deployments across dozens of client sites, the pattern I see most often is not a broken clone or a failed URL replacement. It is a staging site that was set up correctly and then left wide open.
Developers spend 45 minutes getting the clone right and then skip HTTP Basic Auth because "it's just for internal testing." That staging site sits on a public subdomain with a copy of real customer data, real email addresses, and sometimes real payment configurations. The noindex tag does not protect it from a determined crawler or a bad actor who guesses the subdomain.
The second mistake I see constantly is treating staging as a one-time setup. Staging environments drift. The live site gets plugin updates, new content, and database changes while staging sits frozen at the clone date. When you finally push changes, you are merging against a version of production that no longer exists. Refresh your staging clone before every significant development cycle, not just at the start of a project.
The third thing most guides skip: mail configuration. Setting MAIL_MAILER to log mode is not optional. I have seen staging environments send hundreds of password reset emails to real customers because a developer triggered a bulk user action during testing. That is a support nightmare and a trust issue with your users.
Staging done right is not overhead. It is the difference between a confident deployment and a 2 AM rollback. Build the habit of treating your staging environment with the same rigor you apply to production, and your deployment anxiety drops to near zero.
— Ihor
How inSave Hosting makes staging simple and secure
Setting up a staging environment from scratch takes time, and the security configuration alone can trip up even experienced developers. inSave Hosting's managed WordPress hosting includes one-click staging creation directly from the control panel, with automated file and database cloning and URL replacement handled for you. Free SSL certificates cover your staging subdomain from day one, and the platform's LiteSpeed and LSCache stack means your staging environment mirrors production performance accurately. If you are building or managing client sites and need a hosting provider that supports a professional staging and deployment workflow, inSave Hosting gives you the infrastructure without the manual configuration overhead.
FAQ
What is a staging site in web development?
A staging site is a private replica of your live website used to test changes before deploying them to production. It runs on a separate subdomain or server environment with its own database and configuration files.
How long does it take to create a staging site?
Using a hosting panel's one-click tool, staging setup takes under five minutes. Manual setup via SSH and WP-CLI typically takes 30 to 60 minutes depending on site size and server familiarity.
Does a staging site affect SEO?
A correctly configured staging site does not affect SEO. Apply noindex headers and HTTP Basic Auth to prevent search engines from indexing staging content and to block unauthorized access.
Can I use WP Staging on shared hosting?
Yes. WP Staging works on shared hosting environments with standard PHP and MySQL support. The free version handles cloning and URL replacement; the Pro version adds push-to-live functionality for deploying changes back to production.
What is the safest way to push staging changes to production?
The safest method uses Git branches with selective pushes, combined with a full production database backup taken immediately before deployment. For WooCommerce sites, push files and specific tables only to avoid overwriting live order data.